
搜索到
258
篇与
的结果
-
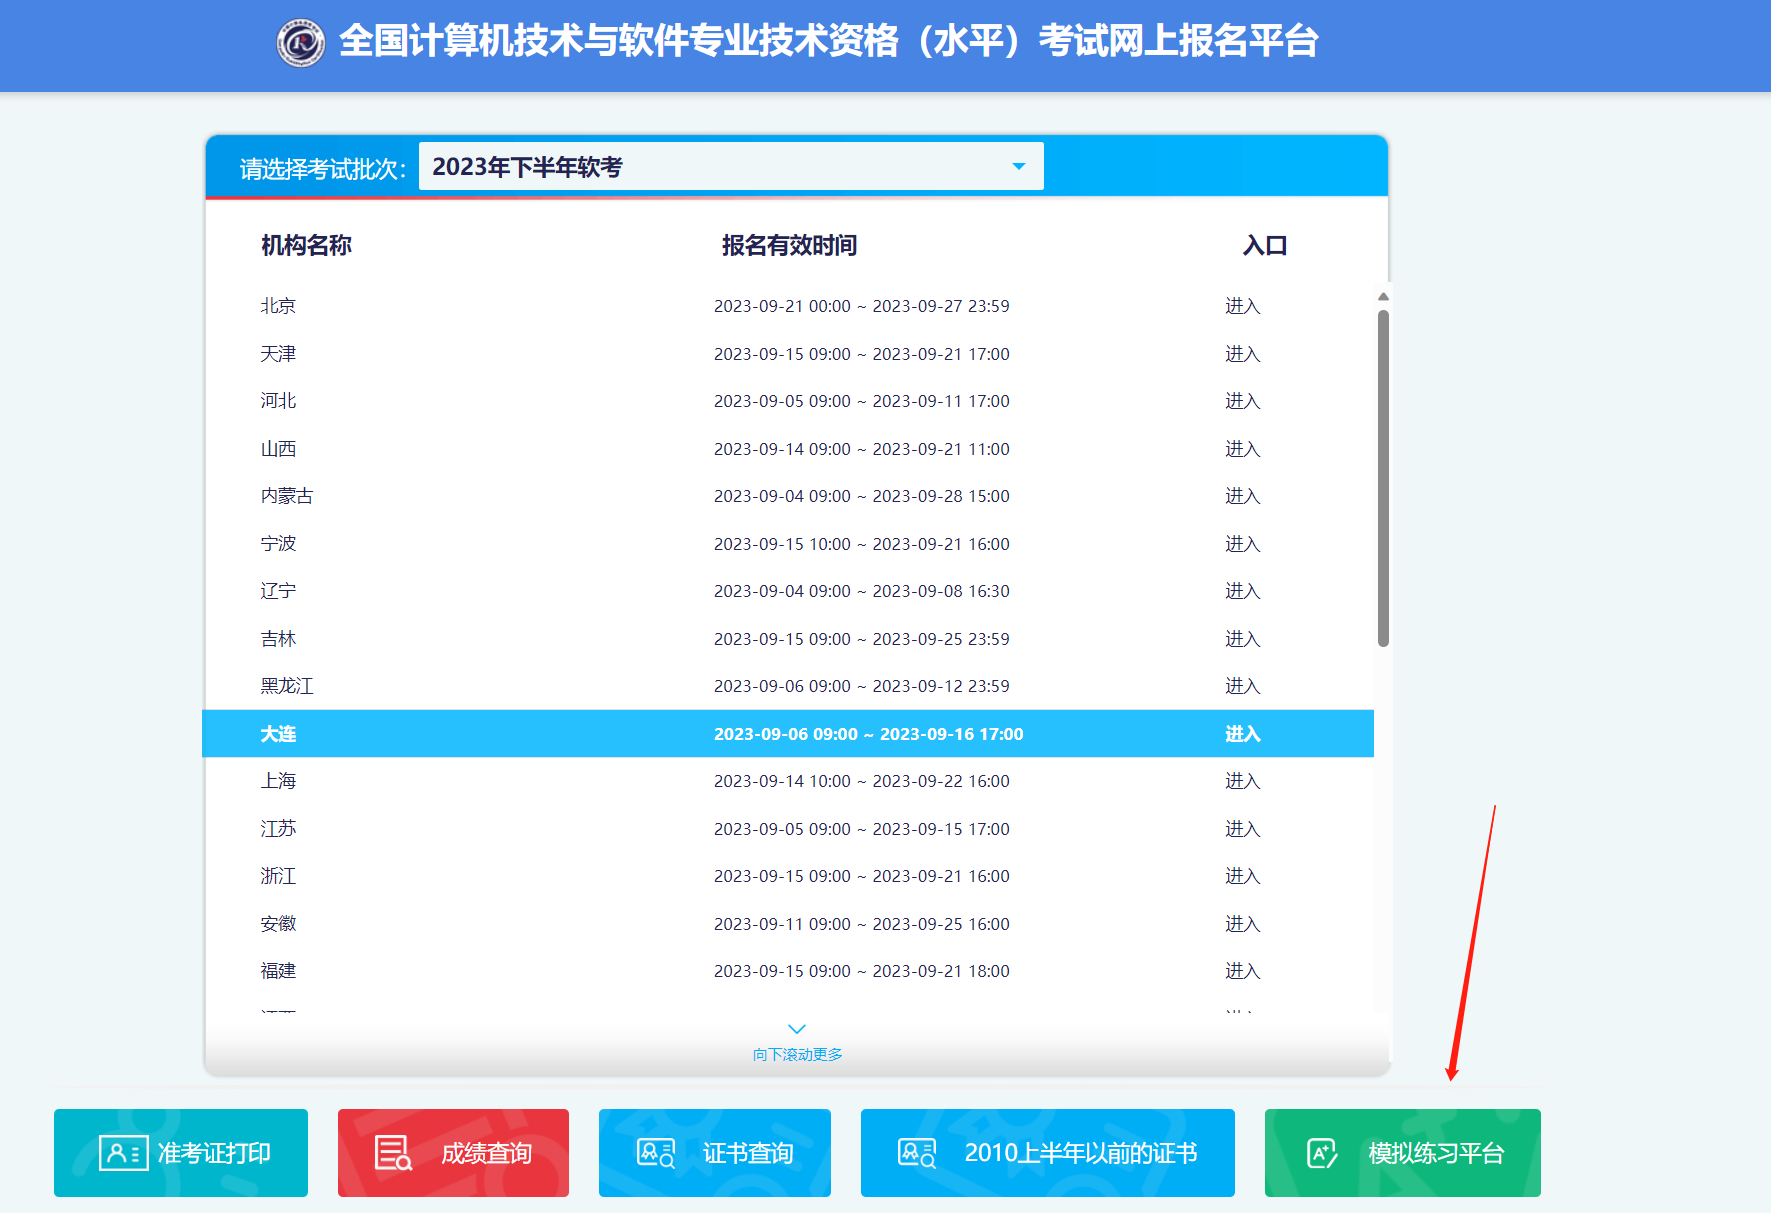
 软考机考模拟系统 2023年下半年计算机技术与软件专业技术资格(水平)考试模拟练习平台上线的公告2023-10-15 来源: 中国计算机技术职业资格网 【字体:大 中 小】 为方便考生熟悉计算机软件资格考试计算机化考试系统操作流程及操作方法,进一步便利考生备考,确保2023年下半年计算机软件资格考试工作顺利进行,工业和信息化部教育与考试中心向参加2023年下半年计算机软件资格考试的考生上线模拟练习平台,现将有关事项公告如下: 一、模拟演练时间 模拟练习平台开放时间:2023年10月16日至11月3日,考生可在该时间内自愿参加网上模拟练习平台练习。 二、登录方式 考生可通过如下网址进入模拟练习平台(登录练习平台需先完成实名认证):https://bm.ruankao.org.cn/sign/welcome,该练习平台仅支持电脑端登录访问,不支持移动端访问。 模拟练习平台旨在让考生熟悉计算机化考试环境和作答方式,考试题型、题量、分值、界面及文字内容以正式考试答题系统为准。 操作过程中如遇相关技术问题,请拨打技术服务电话010-68607740(工作日9:00—11:30,13:30—17:00),或通过中国计算机技术职业资格网(www.ruankao.org.cn/)首页右侧的主任信箱直接反馈。 工业和信息化部教育与考试中心 2023年10月14日模拟系统使用 下载模拟系统运行模拟系统使用软考账号登陆系统选择科目1、综合知识2、案例分析、论文完毕
 -
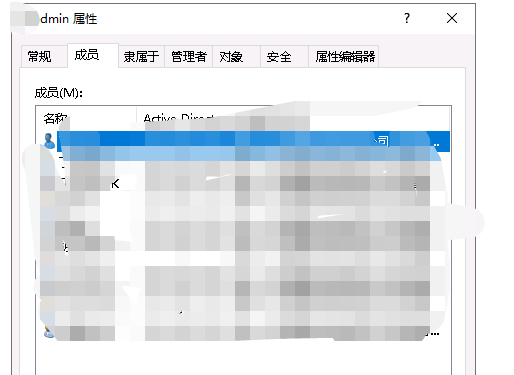
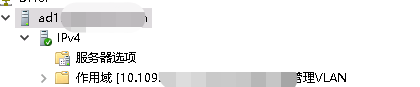
域策略 将域用户加入本地管理员组,替代域管理员权限 问题描述 在域环境中,由于普通域用户无管理员权限,不仅无法安装软件,甚至任务管理器都无法打开;为了方便运维,一般会将IT人员的用户升级为域控管理员,即加入 Domain Admins 组,此方法存在严重的安全风险,域控管理员可登录域控服务器进行任意更改。为了解决此问题,我们通常采用的方法是,在本地计算机上,将用户加入administrators用户组,这样该用户在此计算机上就可以具备管理员权限。而非域控管理员的加域次数是有限制的。由此,我们可以衍生出一种更加简单和安全的方法,即通过域策略将IT人员的账号下发到所有本地计算机的本地管理员组中,并且为这些人员赋予加域和退域的权限。操作步骤 1、新建一个用户组在组中加入需要配置本地管理员的域用户,这样一次操作完成后,后续只需要对组成员进行调整即可2、AD 域委派控制授权域成员管理域在AD用户与计算机 中找到需要进行委外控制的域,委派控制注意,向导仅能进行加域配置,按向导添加完成委派控制后的权限从 域属性 - 安全 中查看和修改点击高级,增加退域权限双击需要修改权限的用户或组,即可进行更加详细的配置3、通过域策略将域用户或组加入本地管理员组打开组策略管理,在域中新建一个组策略右键编辑,在 计算机配置-控制面板设置-本地用户和组-新建-本地组操作:更新 组名:administrators(内置) 成员:添加需要的域用户或组4、刷新域策略在域控服务器刷新域策略gpupdate /force 正在更新策略... 计算机策略更新成功完成。 用户策略更新成功完成。5、本地计算机查看本地组本地计算机刷新域策略或重启后,查看本地组成员>net localgroup administrators 别名 administrators 注释 成员 ------------------------------------------------------------------------------- Administrator 90apt\wangwangjie 90apt\90aptadmin功能测试 1、进行多次退域、加域操作,正常 2、添加后的用户,非域控管理员,在本地计算机上可以使用管理员权限运行程序,正常能力拓展 通过net命令在本地计算机上将用户加入本地管理员组 将用户wangwangjie2加入本地管理员net localgroup administrators 90APT\wangwangjie2 /add 命令成功完成。查看用户组net localgroup administrators 别名 administrators 注释 成员 ------------------------------------------------------------------------------- Administrator 90APT\wangwangjie2从本地组中移除用户net localgroup administrators 90APT\wangwangjie2 /del 命令成功完成。小结 好好好
-
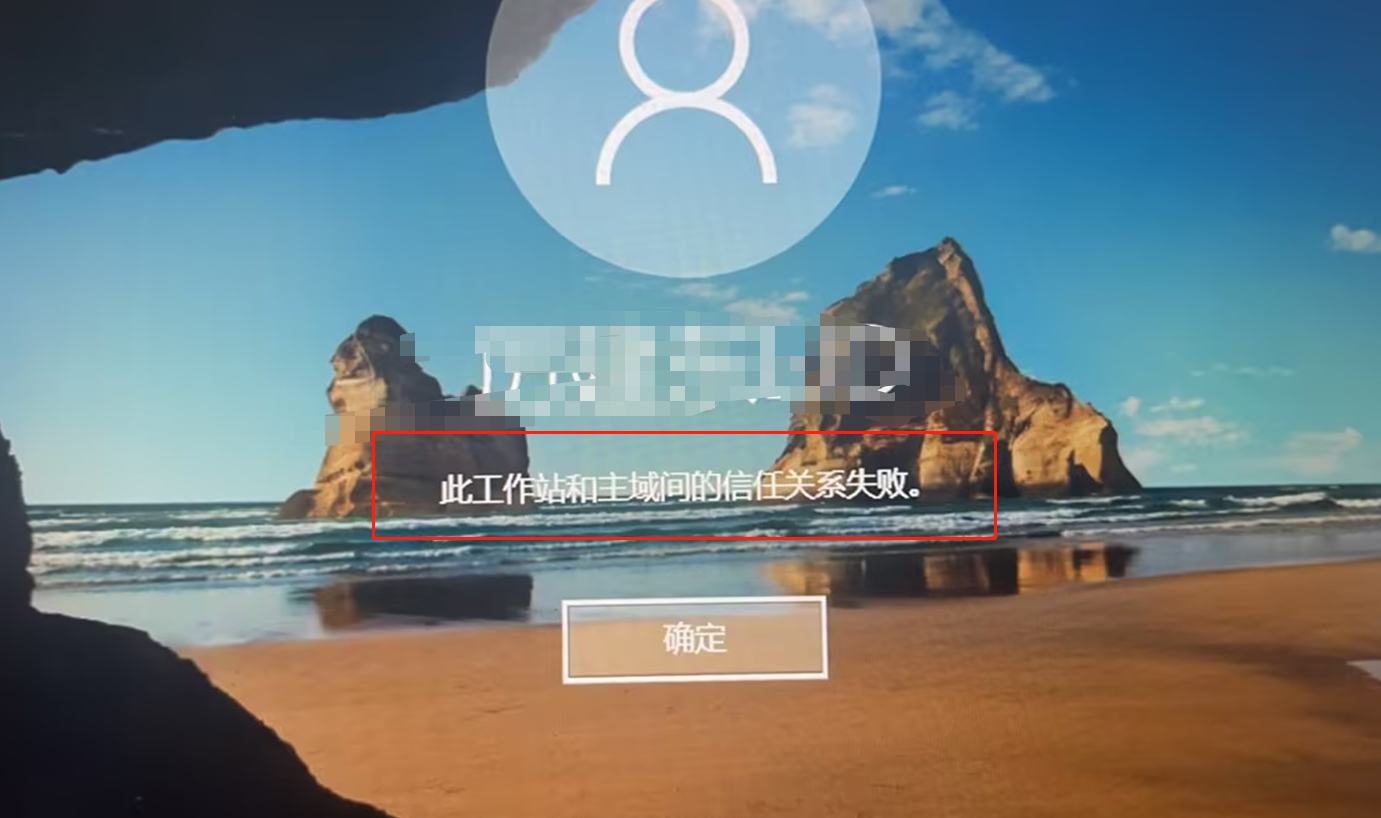
域控信任关系修复-此工作站和主域间的信任关系失败(脱域问题) 故障现象 加域电脑登陆域账号时提示“此工作站和主域间的信任关系失败”修复信任关系 因域用户无法登录,因此登录本地管理员 administrator 运行powershell,查看信任状态为 False 信任关系失败 test-computersecurechannel False修复域信任,使用的域账号需要具备管理员权限90apt.com\wangwangjie为我的域和域管理员,按提示输入域管理员密码test-computersecurechannel -credential 90apt.com\wangwangjie -repair再次查看域信任关系test-computersecurechannel True修复完成域账号再次登录,成功总结 无
-
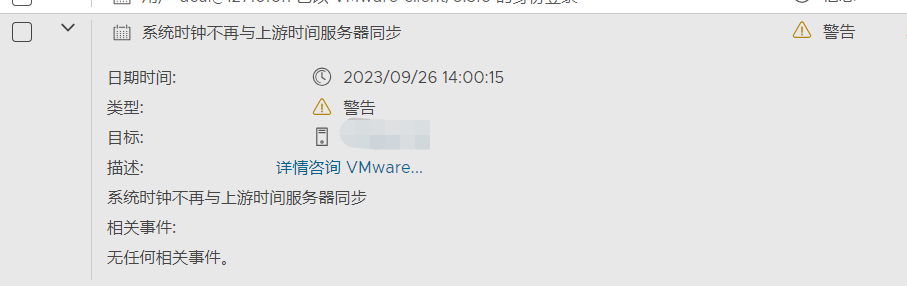
vSphere ESXi 时间同步事件警告 时间同步服务测试-配置未正常工作 告警详情: 事件内容时间同步 -测试服务影响范围: 服务器实际已经同步,推测为探测阶段出现问题测试NTP服务器: 无异常w32tm /stripchart /computer:x.x.x.x 正在跟踪 x.x.x.x [x.x.x.x:123]。 当前时间是 2023/9/26 15:32:17。 15:32:17, d:+00.0152767s o:-01.3336443s [ * | ]排除测试: 更换为备用NTP服务器,等五分钟后再次进行测试,测试通过总结: 判断为:NTP繁忙时,ESXi时间同步探测会出现异常,但不影响实际使用,更换为不繁忙的NTP服务器可以消除警告。
-
Windows Server WDS导致DHCP无法正常工作故障处理 故障记录: 2023年9月20日19:30分,王工进行域控月度系统补丁更新20:00分,接到用户反馈,电脑无网络20:05分,王工发现手机连接wifi后也无法获取IP地址由于DHCP服务器搭建在主域控上,王工进行主域控补丁回退至20:15分,补丁回退完成后,依然无法获取Ip地址随后,王工进行B计划,启用辅域控DHCP功能,配置故障转移集群,交换机配置辅域控为DHCP服务器通过手机测试,辅域控可以正常分配地址20:30分,王工将交换机所有DHCP服务器配置为辅域控地址,故障临时处理完成,恢复业务当前主域控DHCP仍为故障状态,暂时不影响业务,需进行完整排查测试,王工拉了故障处理: 由于无法处理故障,随即联系中心高级系统运维工程师葛工进行处理。1、查看DHCP服务器状态无异常IPV4属性-高级-无法绑定网卡2、查看日志经查看,DHCP事件为端口被占用占用UDP67端口的程序时svchost.exe,无法判断具体原因3、检查服务经查询,这台域控服务器还安装了IIS、DNS、WDS服务WDS默认也是用UDP67端口4、禁用WDS5、重启DHCP服务并绑定网卡6、测试客户机成功通过此DHCP服务器获取IP7、后续处理卸载WDS服务小结: 有故障先看日志,先看日志!
-
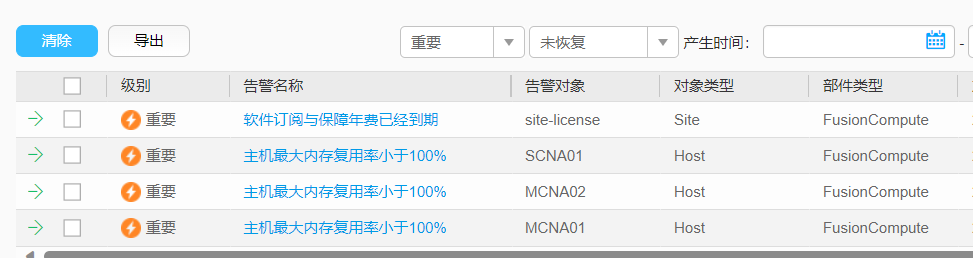
华为超融合FusionCube故障处理“主机最大内存复用率小于100%” 故障现象: 对华为虚拟化进行物理内存升级后,FusionCompute组件出现主机最大内存复用率小于100%的故障告警故障分析: 点击故障告警,进入华为超融合自带的故障帮助告警解释 系统按60秒周期检测主机的最大内存复用率,当主机的最大内存复用率小于100%时,系统产生此告警。 当主机的最大内存复用率大于等于100%时,告警恢复。 对系统的影响 可能会影响虚拟机正常启动。 可能原因 新添加主机,内存swap分区规格过小。 主机增加内存 。 处理步骤 添加一个可用的新的swap分区。具体步骤请参见添加主机内存交换分区。 等待1分钟后,查看告警是否消除。 是,处理完毕。 否,执行3。添加交换分区的帮助文档在FusionCompute左侧导航中,单击。 进入“资源池”页面。 在“主机”页签,单击待操作主机名称。 显示“概要”页签。 在“配置”页签,选择“系统配置 > 内存交换分区”。 进入内存交换分区列表界面。 在列表上方单击“添加”。 弹出对话框。 设置内存交换分区的参数。 名称:内存交换分区名称。同一个主机中添加的内存交换分区名称不能重复。 数据存储:目前只支持本地虚拟化存储。 分区空间(GB):内存交换分区的大小。其取值不能超过所选数据存储的剩余容量。 主机最大内存复用率:默认为主机的当前最大内存复用率,分区空间输入数值后会实时更新。 单击“确定”。 完成主机内存交换分区的添加。可在“任务和事件”页签的任务列表中查看任务进度。故障处理: 按文档要求增加交换分区我这里增加20G,主机最大内存复用率超过100%即可告警自动消除小结: 多看文档
-
内网KMS自动激活windows和office 前提条件: 需要具备自己的内网DNS服务器需要部署KMS激活服务器或使用互联网公共KMS服务器部署的windows需要为企业版,我使用的是LTSC版本部署的office需要为批量许可版或安装office Mondo 2016 - 批量版 - [MondoVolume]许可证连接内网后,自动激活在DNS中配置KMS服务器: 在 DNS 服务器上,打开 DNS 管理器。要打开 DNS 管理器,请依次单击开始、管理工具、DNS。单击需要在其上创建 SRV 资源记录的 DNS 服务器。在控制台树中,展开正向查找区域,右键单击该域,然后单击其他新记录。向下滚动列表,单击服务位置 (SRV),然后单击创建记录。键入以下信息: a. 服务:_VLMCS b. 协议:_TCP c. 端口号: 1688 d. 提供服务的主机:<FQDN_of_KMS_Host>完成后,单击确定,然后单击完成。 示例: 作者:大智在所不虑 https://www.bilibili.com/read/cv8769488/ 出处:bilibili
-
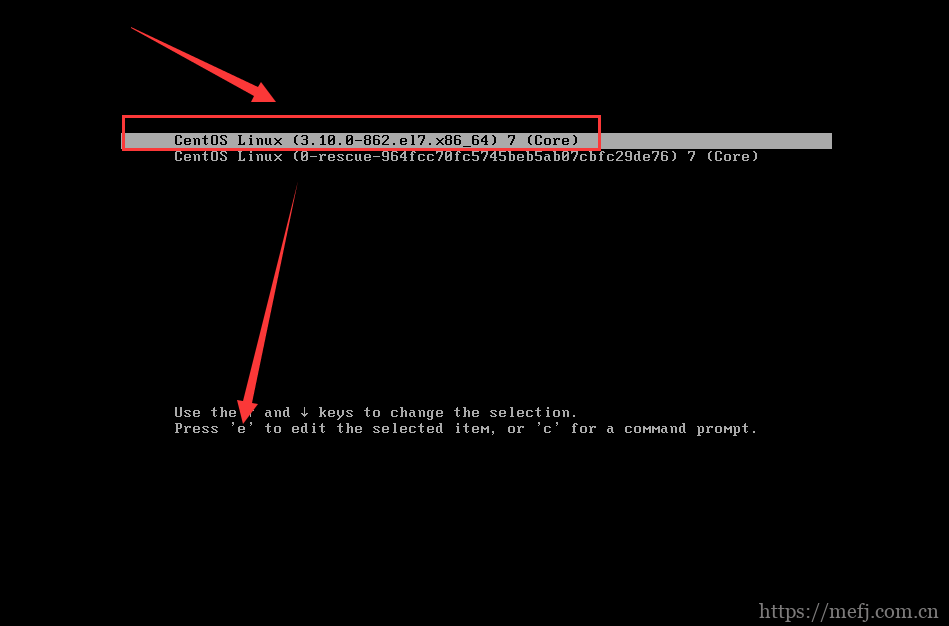
Centos7重置root密码(详细版) https://mefj.com.cn/lur1974.html修改了root密码,步骤如下: 步骤一:在开机出现如下界面的时候就按e键步骤二:在步骤一按下e键之后,出现如下界面,按 ↓键一直到底部找到LANG=zh_CN.UTF-8这句,在这句后面加上init=/bin/sh,然后按Ctrl+x进入单用户。步骤三:挂载文件系统为可写模式mount –o remount,rw /注释:至于为什么要这句命令是因为默认情况在进入单用户模式后,我们的/文件系统是只读模式,无法进行修改,那么这个时候我们就需要用到一条命令mount –o remount,rw / 这个命令来让我们的/路径文件系统为可读模式,这样就可以实现自由修改了。步骤四:执行passwd命令,修改root密码,密码要输入两次要求两次密码要一致。步骤五:如果之前系统启用了selinux,必须执行以下命令,否则将无法正常启动系统touch /.autorelabel。然后执行命令exec /sbin/init来正常启动,或者用命令exec /sbin/reboot重启就OK了。
-
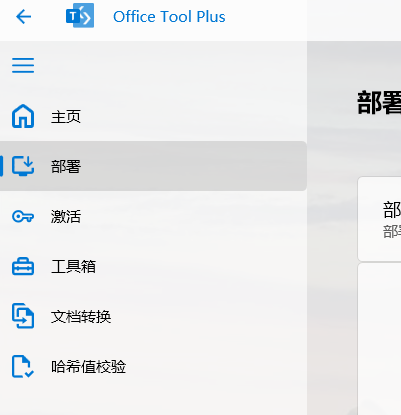
office tool plus全能office部署、激活、卸载工具 一、下载Office Tool Plus {abtn icon="" color="#ff6800" href="https://otp.landian.vip/zh-cn/" radius="" content="官方主页"/} Office Tool Plus 的主要功能 Office Tool Plus 基于 Office 部署工具 (ODT) 打造,可以很轻松地部署 Office。无论你是个体还是团队,Office Tool Plus 都是您的 Office 小助手{anote icon="" href="https://otp.landian.vip/zh-cn/download.html" type="secondary" content="下载地址"/} 二、安装office建议下载 包含框架 (7z 自解压缩包),解压后运行Office Tool Plus.exe点击部署选择需要安装的组件、语言、体系结构后,点击右上角“开始部署”等待安装完成即可三、激活office 可用于所有企业版office1、安装许可证,office Mondo 2016 - 批量版 - [MondoVolume]2、输入kms主机并设置主机:kms.loli.beer 或自行搭建3、点击激活四、取消激活卸载所有许可证五、卸载office当office被破坏无法卸载,使用 工具箱-office工具-移除office,六、总结无
-
python3 multiprocessing windows环境下 pyinstaller打包exe运行无限创建进程问题 https://blog.csdn.net/fly_leopard/article/details/121610641multiprocessing提供了freeze_support来实现main module的安全导入,在运行multiprocessing创建进程前调用该方法:.... if __name__ == '__main__': import multiprocessing # 该方法作用是阻止子进程运行其后面的代码 multiprocessing.freeze_support() pool = Pool(3) try: log.info("Start Program.") pool.apply_async(start_queue_manager, error_callback=error_callback) pool.apply_async(start_server, error_callback=error_callback).ready() pool.apply_async(start_browser, error_callback=error_callback) except: log.error(traceback.format_exc()) finally: pool.close() pool.join()
-
-